
Organizing: What do you do with a a new 18" doll's clothes? This Closet/wardrobe made from corrugated cardboard boxes will work great with 18" dolls such as American Girl, My Life, and many others including Barbie. Cost = about $3.00!
After the gifts were opened last Christmas, we had a mountain of boxes. While some may see these boxes as more recycling, I saw re-purposed possibilities!

My granddaughter Mia had a new 18" My Life doll (that she named Jenna in honor of her cousin), and she needed storage for Jenna's many outfits and accessories. Purchased items for these dolls are often very costly, so we decided to make a closet out of the corrugated cardboard boxes.
The box I chose was 15" long x 8-1/2" wide by 7-1/4" deep, but any similarly-sized box will work.
First, I stood the box upright and removed the flap from the top of the box. I then turned the box around to remove the bottom flap. My battery operated Zip Snip made this job easy!
Tip: Leave the side flaps intact!! These flaps will become the doors of the closet/wardrobe.


 |
| Fiskars Power Gear cutters |
I used a ruler to mark the center of each side about 2 inches from the top edge.

I used a math compass to carefully punch a hole at each marked spot. I widened the hole to the size of the 1/4" dowel and inserted the it to make sure it would fit. I then removed the dowel.


Next, I carefully removed all labels from the box so they would not show through the covering.

Cover it up!
I cut a piece of Quick Cover Adhesive Covering, removed the backing, and set the box on the sticky side of the covering. I then wrapped the box almost like a package! I snipped the corners of the covering and removed some of the excess to make it easier. I also covered the inside of the flaps and the floor of the box.
Tip: I used Quick Cover Adhesive Covering (by Contact) to cover the box. It was purchased at Dollar General for $2.00. This covering allows you to lift and re-position it if needed.


Tip: Jewelry and hats can be hung on the erasers!


 |
| ...and the hangers were hung... |
For doorknobs, I looked through my decorative button collection and found 2 shank buttons with metal hooks that secures them to the card. These will be perfect!
 |
| Backside of buttons on card |
I measured and marked the placement for the buttons on both of the doors (flaps). I pushed the shank of the buttons through the hole on the doors and slid the metal hook through the shank. A small elastic ponytail holder was used to hold the doors closed.


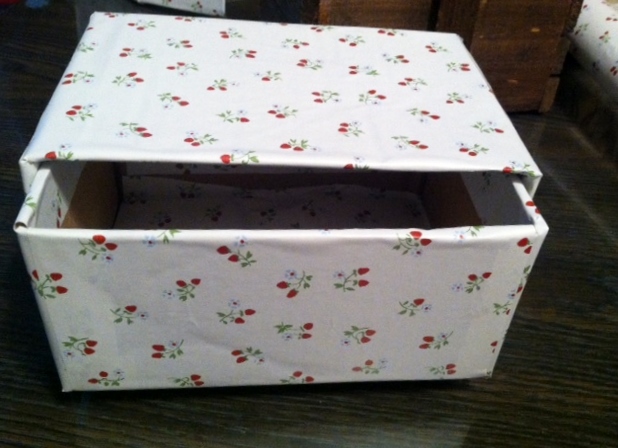
Jenna needs more storage!
I am not finished yet! Jenna has some clothing and shoes that won't fit on hangers! She needs a drawer!
I went back to my box collection and found 2 boxes - one would just fit inside the other, and the larger would fit perfectly inside the closet/wardrobe! I marked the boxes and cut them to size.


I then removed the labels and covered them with the adhesive-backed covering.

 |
| It fits! |
 |
| ...through the button... |
 |
| ...through the hole and button... |
 |
| ...twist securely... |
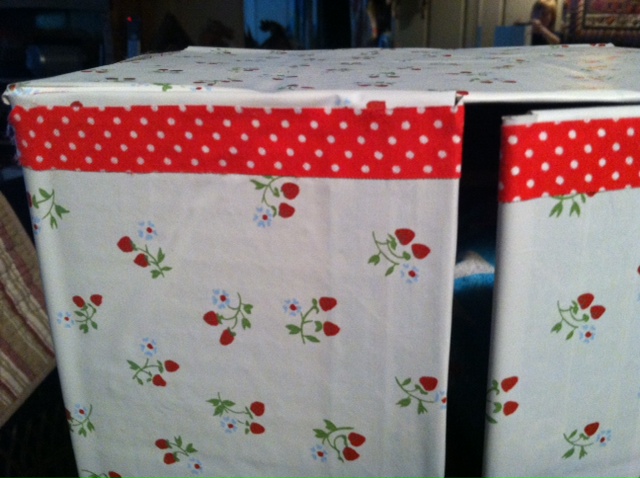
To add some some extra charm (and cover up rough edges), I added fabric tape from Dollar Tree to the top edges of the doors.
It's finished!
 |
| Jenna's new closet! |
 |
| Granddaughter Mia and Jenna |
Ms. Nancy's Extra Tips:
I loved doing this project, and seeing how well Mia liked it made it even more special! Of course, we plan to do more!
- If you don't want to use Quick Cover, you could also paint the box, cover with fabric, color with markers, add stickers, etc.
- The small drawer could also be used on its own, or several could be stacked and taped together for a chest.
- If you don't have a button collection for the knobs, you could use empty thread spools, jewelry such as old rings, washers, beads, etc. The possibilities are endless!
|
| We love being organized!! |
thank you!!
ReplyDeleteYou are very welcome!
Delete