
.JPG)
...it needed "Upgrades"!
The Pants
I used a pair of elastic-waist pants to add to Mia's shirt. First, I made cuts about 1/2" wide in the pocket flap to create fringe.


The Headband
For the headband, I "shopped" in my closet and found a fabric "Tie" belt. It was a little bit too long, so I cut a few inches off each end. (See below for how these pieces ended up!)
I measured and cut a piece of metallic braid about 3" shorter than the circumference of Mia's head.


I pinned and used a zigzag stitch to sew the braid to the center of the belt.


Next, I cut 2 - 15" lengths of soft hollow rounded trim. (99 cents for a package)

I used Tacky Glue to attach feathers to the inside of each end of the hollow trim.


I wrapped the ends of the trim with crochet thread and tied them tightly.


I staggered the ends of each rounded hollow trim, pinned, and sewed them to the headband.


I also sewed a large feather to the headband. Yes, it can be done!


The Makeup
Heejin, Mia's Mom, added makeup and braided Mia's hair.


Remember the pieces of the fabric belt that I removed? They became wristbands when I sewed more of the hollow trim to them. I then tied them to Mia's wrists.


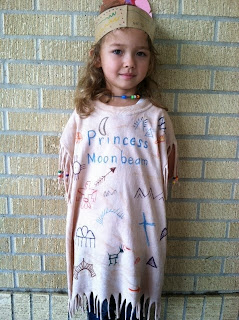
Here's the finished costume: Native American Indian Shirt - with Upgrades!
|
| "Princess Moonbeam" loves to pose for photos! |


 |
| Mamaw and Mia |
 |
| "Upgraded" Native American Indian Costume |
How to Make a Native American Indian Shirt
No comments :
Post a Comment